
Am I going to be affected?
If you display a map generated by Google on your website, you are going to be affected and need to take action.
How am I going to be affected?
In all likelihood, all you will have to do is give your credit card details to Google. You won’t be charged for anything unless your usage goes above a certain quota – which is large enough for the vast majority of websites that display Google maps.
Although you can still use Google maps for free, Google requires you to create a billing account with them, complete with credit card details – just in case and for identification purposes.
What is covered by the free Google maps plan?
In Google’s words, they are offering you $200 free credit per month. That would cover 28,000 views of a map on your website each month… the way we usually implement it at Studio 24. You will also benefit from improved support. As their pricing changes, Google will also extend their customer support to all customers, including those using free services.
There are several techniques for adding Google maps to a website and each has their own pricing and free quota. Map functionalities such as getting directions and looking for places on a map also have their specific charge per request and free number of requests per month.
Here is the full pricing table provided by Google.
Please note that if you are charity, you can probably benefit from Google Maps services for free. More information on Google for non–profits.
Which Google Maps Services are being used on my website?
To determine which services apply in your case, it’s best to ask the person who set up your website. In the meantime, here is a quick explanation of the different services listed in the pricing table. First of all, there are three main types of services: maps, routes, and places. Maps cover the ‘basic’ functionalities of displaying maps, potentially with markers pointing to specific places. Routes cover all actions related to calculating and displaying routes and directions on the maps. Places relate to searching and displaying information about places (businesses, points of interest) registered with Google.
As you can see from the Maps pricing table, there are various services that can be used for rendering a map. There is no obvious way to determine which of these is used on your website without some knowledge of web development. Still, here is a summary of each service listed in the table:
- Mobile Native Static Maps and Mobile Native Dynamic Maps – These are maps that open directly on an Android phone from a mobile app (and not from a website – viewing a map included in a website from a smartphone falls under the other categories listed below)
- Embed: Embedded maps are fully interactive maps that are centered on a specific place indicated by a marker, and come with the default Google Maps functionalities – they cannot be customised. Technically speaking, they are iframes (pretty much) copied and pasted as is from Google.
- Embed Advanced: These are embedded maps as above but they either display directions between places, the result of a search for places or on the contrary, they do not display any specific marker or directions.
- Static map: A static map displays a map as an image and is not interactive – no zooming and navigation. Quite surprisingly, these static maps are chargeable whereas the interactive embedded maps are free.
- Dynamic map: This is an interactive, customised map that is generated by Javascript code. This is the technique usually used by Studio 24 to implement maps. This service allows us to implement maps that our clients can easily generate themselves via their content management system.
- Static Street View: Similarly to the static map, this is an image of a place seen at street level, with no interaction possible.
- Dynamic Street View: Similarly to a dynamic map, this is an interactive view of a place at street level. It allows the map user to navigate routes at street level.
How can I check my usage of Google maps isn’t above that free plan?
Your current usage is detailed in your Google API console.
If you are not logged in to your Google account yet, do this first.
You should see a screen like this one, with statistics of your usage of the Google API (which is most probably limited to using the Map API):
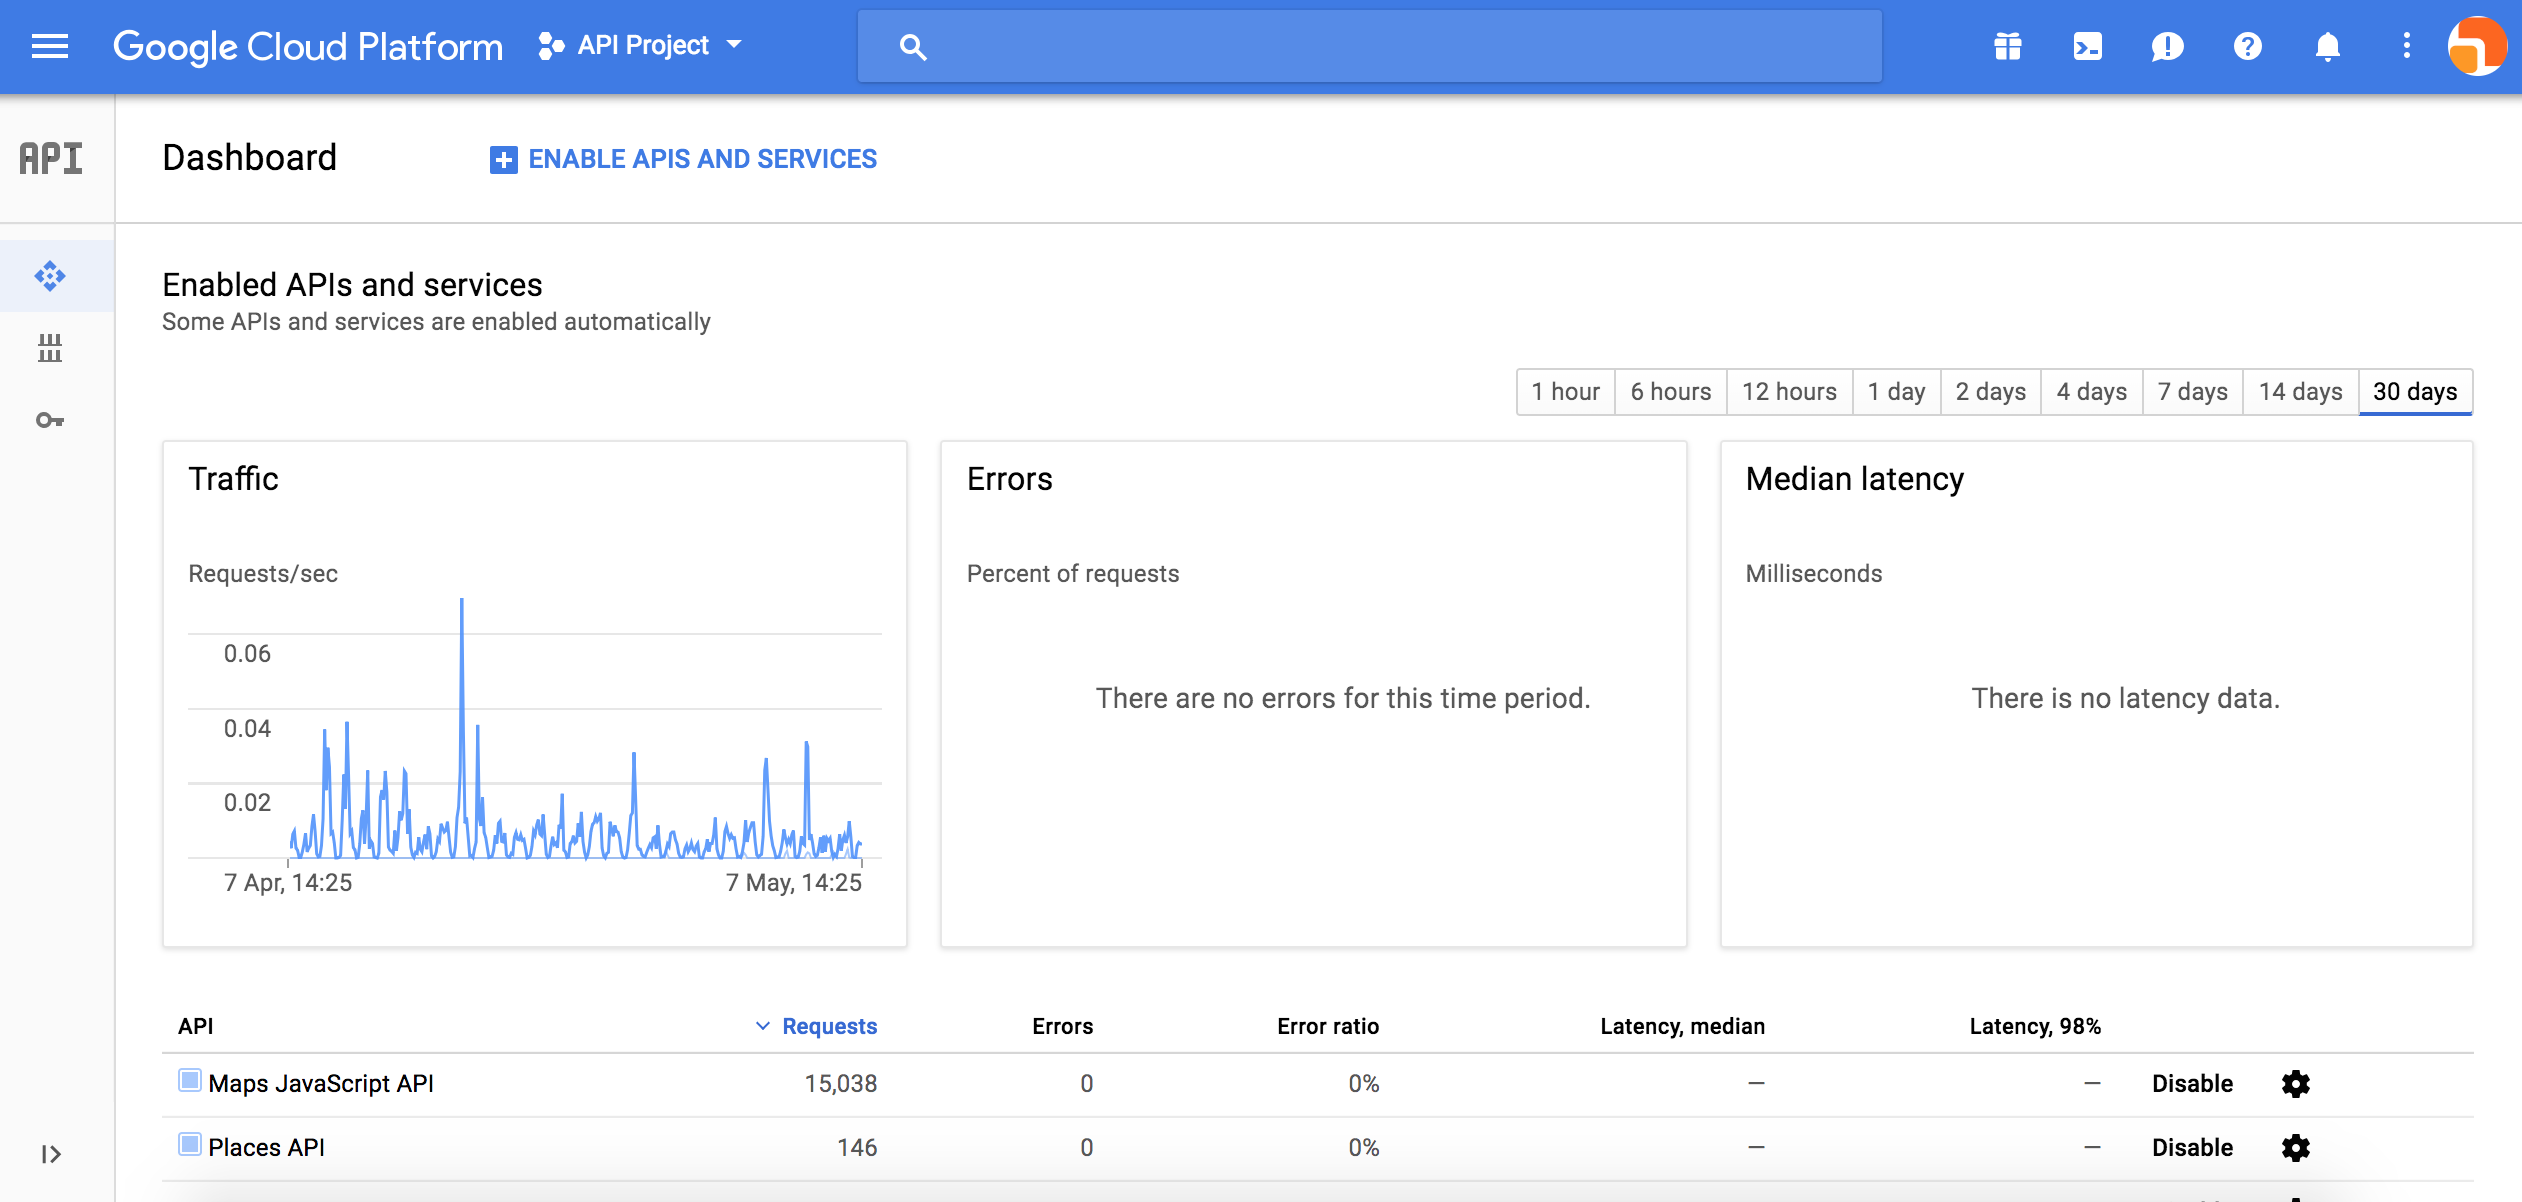
Please note Google changes their interface on a regular basis. Whilst writing this article, I was served two different interfaces by Google – they were probably trialling one of them. The alternative to this one is already set to display data over a month and the API usage table is at the top left of the main content (replacing the ’Traffic’) graphic of the screenshot above.
At the top of the page, right after the Google Cloud Platform logo, you can see a drop-down menu that lists all your API projects (i.e. your websites). Most of you will only have a single project, which is your main website. If not, you can switch between websites here to view your API usage for each.
Above the graphics and table, you can see a menu to select the number of days for which you’d like to get usage data. Select 30 days to get your usage over a month and therefore be able to compare the data with Google’s pricing table. It’s the table at the bottom that we are interested in as it shows the number of requests to the Google API per service per month (provided you have selected ’30 days’ as suggested above). Comparing that table with Google’s pricing table will tell you how (un)likely you are to have to pay for your usage of the Google maps API.
In the screenshot above, for example, I can see 15,038 requests have been made to the Maps Javascript API by this project over a month – which is well below the 28,000 requests per month covered by the $200 free monthly credit.
How do I set up a billing account?
Google has launched a transition tool to help you easily add billing to your projects. If you ever drop out of this transition process or need another way of doing it, here is are the steps required to add billing to your Google Maps API projects.
You first need to create a billing account, unless you have on already, and then link that account to your web project that uses the Google maps API.
To create a billing account, go to the Google Cloud platform billing screen.
There you will be prompted to add a billing account. Follow the account creation procedure.
Once you are done, go back to the main billing screen.
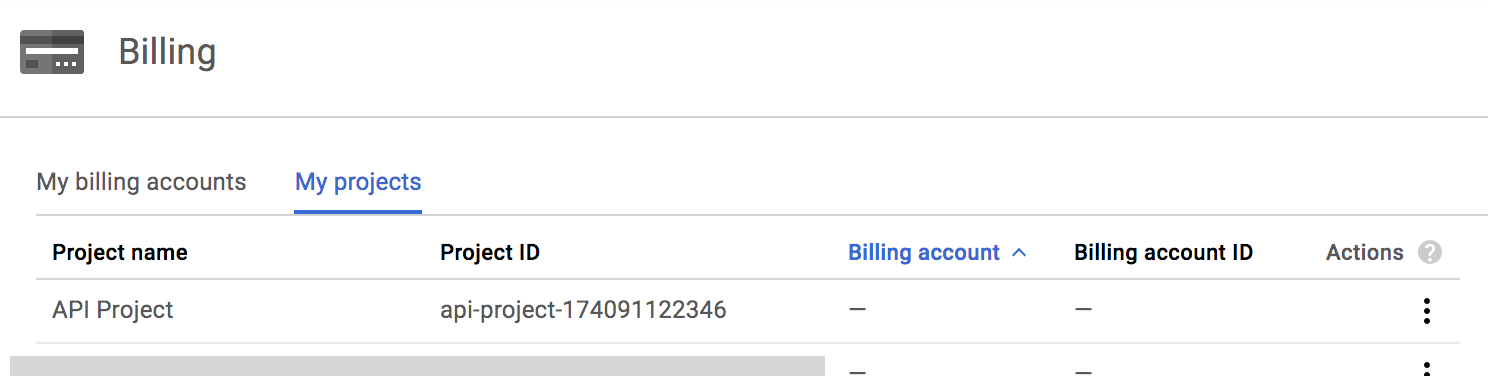
Click on the ‘My Projects’ tab (next to ‘My billing accounts’). You will see a table listing your projects – like this one:
If you cannot see any project, you might need to select your ‘organisation’ from a drop-down menu that would have appeared above the table.
For each project, click the three dots icon in the ‘Actions’ column and select the ‘Change billing account’ option. Choose the account you want to associate the project with, and click ‘ click the ‘Set account’ button.
What happens if my Google maps usage increases or suddenly peaks above the free quota?
You will be charged by Google on a pay-as-you-go basis, at the rates detailed in this pricing table.
In the extremely unlikely case in which your usage peaks above 25,000 map loads IN A DAY, your maps will stop working for the rest of the day. If that use rate is expected to remain that high, you will have to get a premium plan license from Google.
What happens if I don’t create a billing account by the 11th June?
Your maps will stop working from the 11th June 2018. They will start working again when you create a billing account.
How can I cap my usage of Google maps to avoid being charged?
First of all, you can start by setting up email alerts when your billing account is going to go over the $200 credit provided by Google in a month. Note that this will NOT prevent you being charged if you exceed your budget. It will only alert you at certain points of usage of your budget.
Go to your Google account billing screen.
Click on the name of your billing account.
On the left-hand side, click ‘Budget & Alerts’.
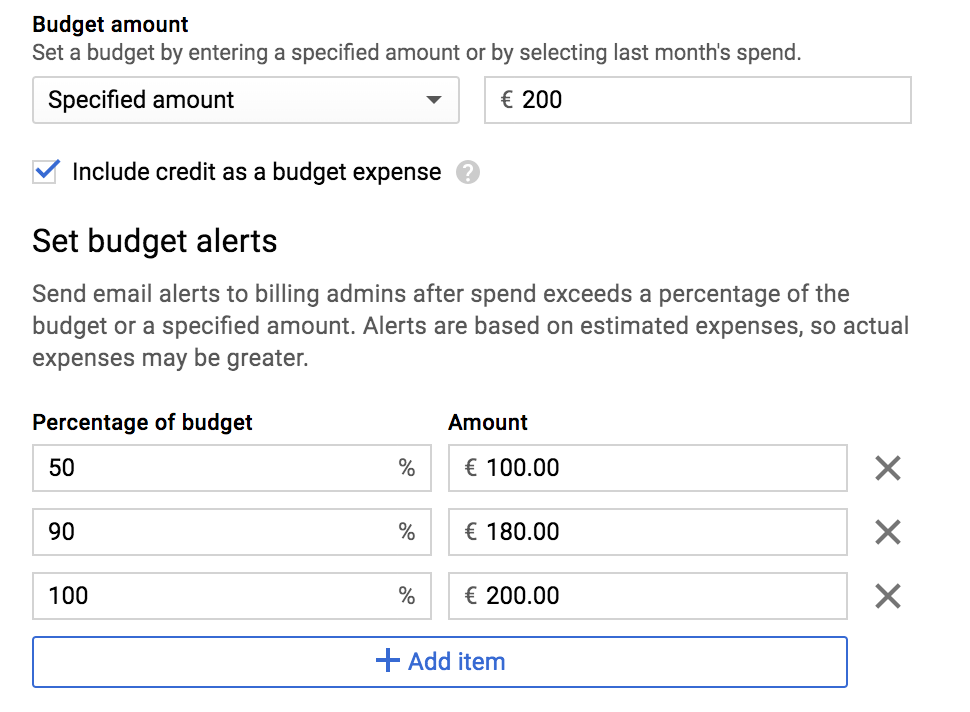
Click the ‘Create a budget’ button and fill in the budget and alerts form. Here is an example of the budget set up to alert via email at various points of use of the free credit provided by Google:
You can also set a maximum quota per service PER DAY in your API console. Your maps will simply stop working for the rest of the day when you exceed that daily quota.
To set these quotas, first of all, make sure you have enabled billing for your project. Otherwise, you won’t be able to do it.
If you have more than one project, select your project from the drop-down at the top of the screen, next to the Google Cloud platform logo.
Find the table that lists the API services in use by the project. For each service, click on its name. Click the ‘Quotas’ tab. Scroll down to find the quotas table – see screenshot below:
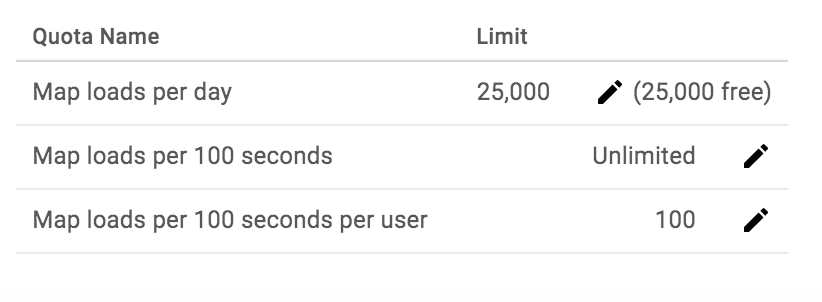
Edit the daily quota by clicking the ‘Edit’ icon in the first line of the table. Set it to a 1/30 of the monthly free allowance for that particular service. For example, set it to 933 requests per day in the case of the Maps Javascript API.
Are there alternatives to Google maps?
Yes, there are open source and completely free alternatives to Google Maps. We also use the LeafletJS library. Which can replace the Google API and display maps from a range of providers, such as the open source OpenStreetMap. You can see an example of a customised LeafletJS powered map that Studio 24 developed for HS2.
If you’d rather move away from Google services, we can replace the Google maps of your website with one served using LeafletJS. It will require and some development work but may well be worth the peace of mind.